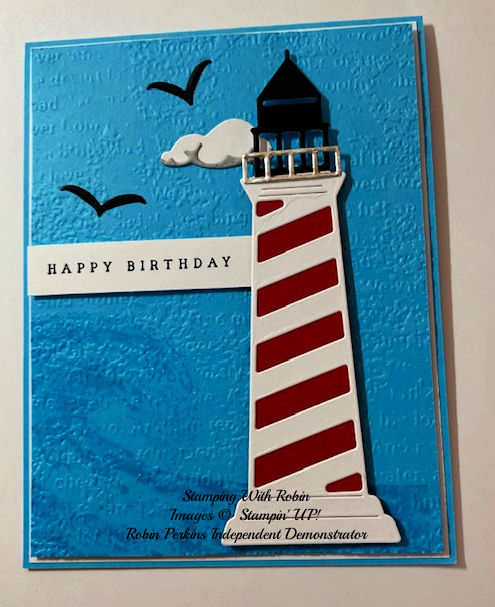
Today is a beautiful day to visit a lighthouse. I’ve used the latest Stampin’ Up! lighthouse stamp set and dies to make today’s birthday card. If you’re a lighthouse enthusiast, then you’ll want to add this bundle to your collection.
Recipe
• Card Base – Tahitian Tide Cardstock 4 ¼ x 11 scored at 5 ½ – Card is Portrait
• Card Front Layer – Basic White Cardstock 4 1/8 x 5 3/8
• Card Front Top Layer – Tahitian Tide Cardstock 4 x 5 ¼
a. Basic White Cardstock 2 x 5, 2 scrap pieces 1- cloud, 1- sentiment
b. Real Red Cardstock 2 x 5
c. Scrap of Silver Foil Specialty Pack, Basic Black Cardstock and Gray Granite Cardstock
• Inside of card – Basic White Cardstock 4 x 5
Supplies
• Lighthouse Point Stamp Set # 158901
• Lighthouse Dies # 158906
• Waves of Inspiration Stamp Set # 158833
• Waves Dies # 158840
• Deckled Rectangle Dies # 159173
• Cardstock – Tahitian Tide # 159261, Real Red # 102482, Silver Foil Specialty Pack # 156457, Basic Black # 121045, Basic White # 159276 and Gray Granite # 146983
• Ink – Night of Navy # 147110, Tahitian Tide # 159210 and Soft Suede # 147115
• Stampin Blends – Pumpkin Pie Light # 154897 and Crumb Cake Light # 154882
• Timeworn Type Embossing Folder # 156505
• Dimensionals and Multipurpose Liquid Glue
• Envelope # 102619
Directions
- Fold your Tahitian Tide Cardstock Base in half at 5 ½. Adhere the Basic White layer to the card base with glue. Set aside.
- Die cut solid lighthouse using Real Red Cardstock. Place the detailed lighthouse die on the white cardstock and die cut. Continue die cutting the top of the lighthouse with Basic Black and use Silver to cut the catwalk railing. Die cut 2 birds and the cloud from the Waves Dies.
- To assemble the lighthouse – Take the Real Red and cut off the top section of the lighthouse. Take the Basic White lighthouse adhere glue on the back side up to where the catwalk is. Line up the base of each lighthouse creating one single lighthouse. Take the black top lighthouse section and adhere it over top of the white one. Finish the lighthouse adhering the silver catwalk railing.
- Stamp the front top layer – Tahitian Tide Cardstock with the wave stamp with Tahitian Tide ink. You only want about an inch and half of the big wave however you want the water to go across the bottom. Once the ink is dry emboss this layer using the Timeworn Type Embossing Folder
- Stamp your sentiment in Night of Navy – mine is ½ x 2 ½ – I used Happy Birthday from Waves of Inspiration
- Assemble the cloud by adhere the Gray Granite to the bottom of the cloud
- Assembling the card front – Using dimensionals adhere the front top layer onto the Basic White. Take the cloud and see where to adhere it to the card front so you can see a little of the cloud when looking through the top of the lighthouse. Adhere cloud with glue. Using dimensionals adhere the lighthouse so we see the cloud. Add the birds with glue. Using dimensionals adhere the sentiment to the card. Take wink-a-stella and apply it over the waves to make the water look more real.
- Inside Section – Stamp a sentiment – I added the Pelican from the Waves of Inspiration using Soft Suede ink along wit Pumpkin pie & Crumb Cake light Stampin Blends.
I hope you enjoyed our adventure to “Lighthouse Point” today.
Happy Stamping!
Robin
Leave a Reply