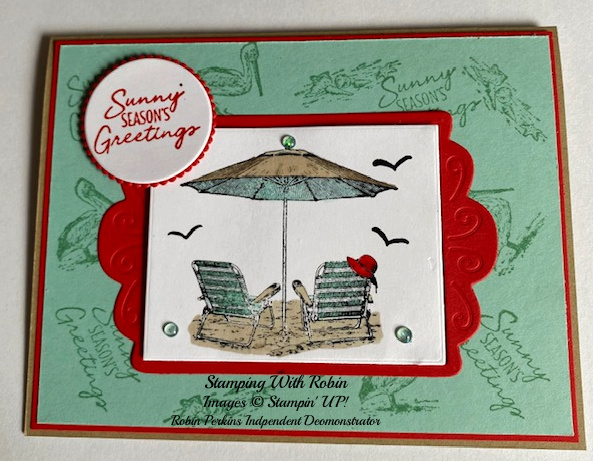
Believe it or not I’m already making Christmas cards! Trying to be sure I have all my card made early this year because I’m always making card the week of Christmas, it seems. Today we’ll combine summer and Christmas together for our first card of the season.

Card Recipe
- Card Base Crumb Cake Cardstock 5 ½ x 8 scored at 4 ¼ Card is landscape style
- 1st Layer – Poppy Parade 4 1/8 x 5 3/8
- For 2nd Layer – Pool Party 4 x 5 ¼
- Cut 2 Fabulous Frames 1 Poppy Parade & 1 Basic White Cardstock to be 4 3/8 x 2 ¾
- 2 x 2 scrap of 1 Poppy Parade & 1 Basic White Cardstock for the sentiment
- Inside of card
- 1st Layer Poppy Parade Cardstock 4 x 5 ¼
- 2nd Layer Basic White Cardstock 3 ½ x 5
Supplies
• Sunkissed Stamp Set # 155908
• Waves Stamp Set # 158833
• Fabulous Frames Dies # 159163
• Deckled Rectangles Dies # 159173
• Layering Circles # 151770
• Cardstock – Crumb Cake # 120963, Poppy Parade # 119793, Pool Party # 122924, and Basic White # 159276
• Inks – Memento Tuxedo Black # 132708, Crumb Cake # 126975, Poppy Parade #147050, Pool Party # 147107
• Stampin Blends Poppy Parade # 154958, Crumb Cake # 154882 and Pool Party # 154894
• Wink of Stella # 141897
• 2021 – 2023 In Color Opal Rounds #159185
Directions
- Fold your Crumb Cake Cardstock Base in half at 4 ¼.
- Start by creating the background layer – Pool Party Cardstock & stamp with Pool Party ink, stamp randomly the sentiment, pelican and the seashells.
- Next stamp the umbrella & chairs onto the Basic White Cardstock with Memento Tuxedo Black ink. Coloring with Stamping Blends, sand – Crumb Cake, chairs – Pool Party, underside of the umbrella – Pool Party, top of the umbrella – Crumb Cake and the hat – dark Poppy Parade.
- You can stamp some birds from the Stamp Set Waves.
- Stamp the sentiment on the 2 x 2 Basic White Cardstock & die cut it with the 2nd from the smallest circle in the layering circles. With the same size Poppy Parade Cardstock cut the matching size scallop piece. Adhere these pieces together.
- Assembling the card front – Adhere the background layer to the Poppy Parade. Take these layers and adhere them to the card base. Next, center the Poppy Parade Fabulous frame on top of the background layer by adhering with multi glue. Take the umbrella & chairs and place in the center of the frame using dimensionals. Add the sentiment on the left side of the frame & only use 1 dimensional on the left side so it’s even.
- To finish the front of the card, use wink of Stella on the hat and then add the Opal Rounds.
- Inside card – On Basic White Cardstock stamp a sentiment in Poppy Parade and you can add the pelican and shells towards the bottom in Crumb Cake. You’ll adhere the layers together and then adhere them to the inside of the card.
Congratulations, your first Christmas card is done and it’s July!
I hope you enjoyed “Sunkissed Christmas”
Happy Stamping!
Robin
Leave a Reply